
다수 치아 상실, 비용 부담은 줄이고 씹는 기능을 되살린 기록
여러 개의 치아를 상실했지만 개수와 비용 부담으로 치료를 고민해오신 환자분의, 사분악 어금니 우선 회복 전략과 수면(의식하진정법) 발치·식립 과정을 명일동치과 김민수 원장이 순서대로 정리했습니다.
안녕하세요, 명일동치과 서울더자연치과 치과의사 김민수입니다.
오늘은 임플란트 비용이 부담스러우신 분들을 위해 비용을 최소화 하면서 효율을 극대화 시키는 치료케이스를 설명드리도록 하겠습니다.
임플란트는 꼭 필요한 경우라면 진행하는 게 맞지만, 개수가 많아질수록 임플란트 비용과 치료 기간에 대한 부담이 함께 커지는 것도 사실입니다. 아마 이 글을 보고 계신 분들 중에도 비용에 대한 부담을 한 번쯤 느껴보신 분이 계실 텐데요. 오늘은 치아가 여러 개 빠지고 남은 치아도 상태가 좋지 않았던 분을, 비용 부담을 줄이는 방향으로 계획을 세워 치료했던 사례를 순서대로 정리해 보겠습니다.
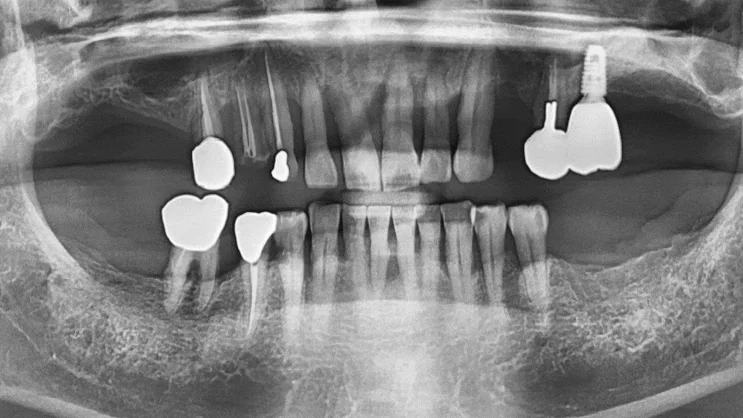
진단 – 다수 치아 상실에 이차 우식까지
내원 당시 촬영한 파노라마를 보면 상·하악 양쪽 어금니 부위에 치아가 비어 있는 공간이 여러 곳 관찰되었습니다. 저는 이런 사진을 볼 때 단순히 이가 없다는 사실만 보는 것이 아니라, 얼마나 오랫동안 비어 있었는지, 그 결과 주변 뼈의 높이가 얼마나 유지되고 있는지를 함께 살펴봅니다. 치아가 빠진 자리는 시간이 지날수록 치조골이 서서히 흡수되기 때문에, 상실 기간이 오래될수록 나중에 임플란트를 심을 수 있는 뼈의 양이 줄어들 수 있습니다.
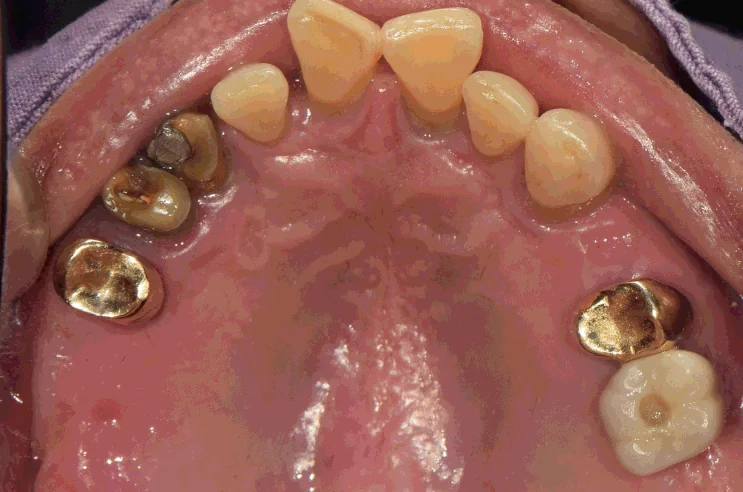
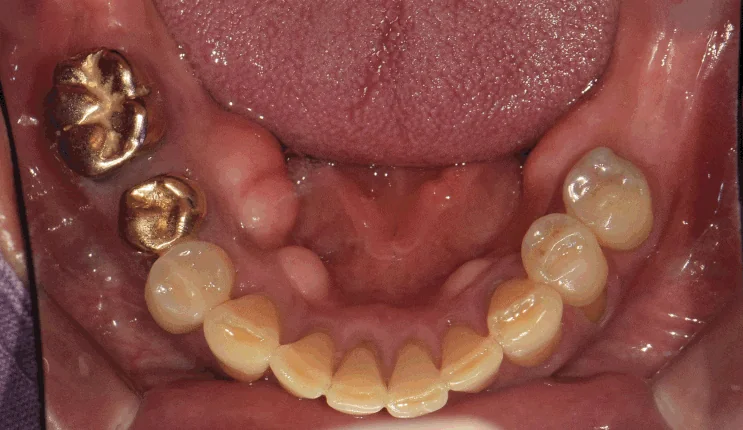
교합면을 직접 촬영한 사진에서도 여러 개의 어금니가 빠져 있는 것과 함께, 남아 있는 치아 중 오래된 보철물 아래로 이차 우식이 진행된 곳이 관찰되었습니다. 남아있는 치아 중 일부는 오래된 보철물이나 착색이 있는 상태였는데, 이런 부분은 임플란트 치료와 별개로 함께 점검이 필요한 부분입니다.
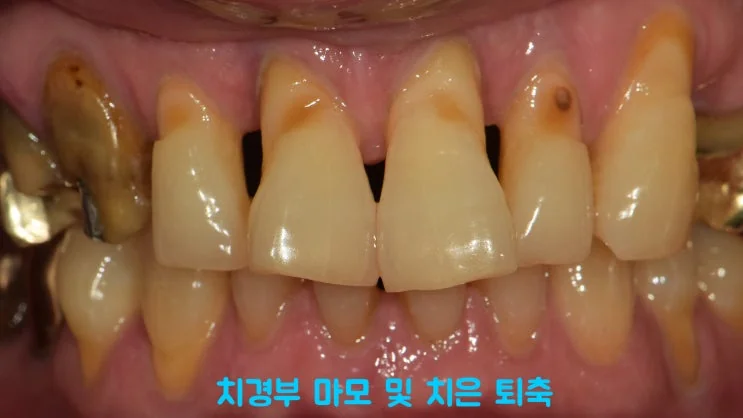
앞니 쪽으로는 치경부 마모와 치은 퇴축이 함께 보였습니다. 어금니는 본래 음식을 잘게 부수는 저작 기능의 핵심을 담당하는데, 이 기능이 사라지면 앞니나 남아있는 다른 치아가 그 역할을 대신 떠맡게 됩니다. 앞니는 원래 씹는 힘을 견디도록 만들어진 구조가 아니어서, 이런 상태가 오래 지속되면 남아있는 치아에 과도한 부담이 쌓여 마모나 파절로 이어질 수 있습니다.
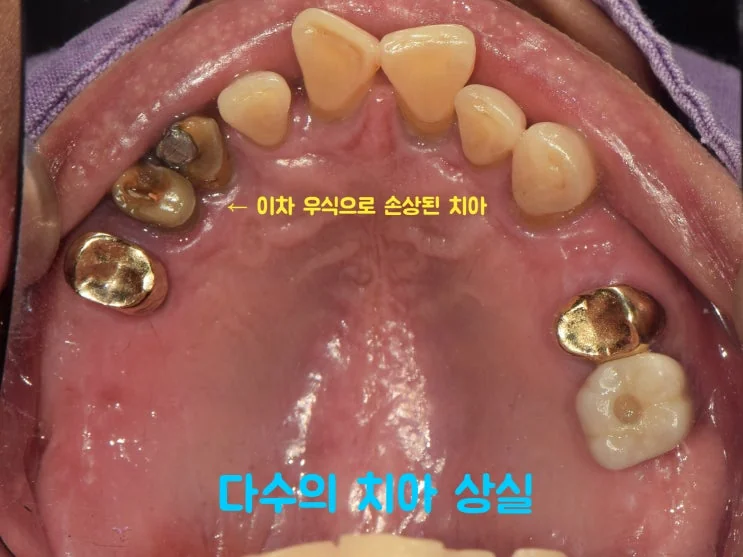
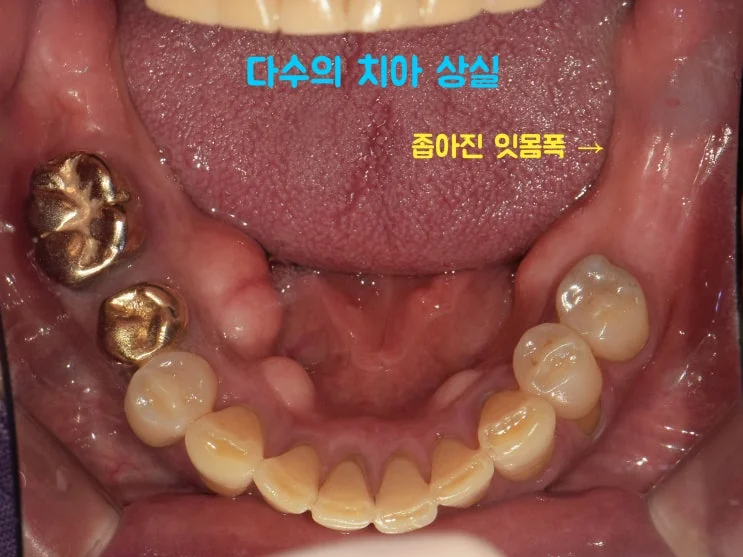
치아가 빠진 자리는 시간이 지나며 잇몸 폭까지 좁아진 상태였습니다. 검진 결과, 지금 바로 정리를 시작하지 않으면 남아 있는 몇몇 치아까지 함께 나빠질 수 있는 환경으로 보였습니다.
치료 계획 – 비용을 줄이는 전략적 식립
현 상황만 놓고 보면 다수의 식립이 필요해 보였지만, 임플란트 비용과 기간을 함께 고려하면 그대로 진행하기는 현실적으로 어려운 부분이 있었습니다. 그래서 선택한 방향은, 상·하·좌·우 각 구역마다 어금니를 1개 정도씩 회복시켜 ‘씹는 기능’을 되살리는 것이었습니다.
식립 개수는 최소화하면서도 저작 기능은 확보하는, 전략적인 계획인 셈입니다. 아무리 효율을 따지더라도 치아가 제 기능을 할 수 있게 만드는 것이 제가 해야 할 몫이라 생각했기에, 잃어버린 저작 기능을 되살리는 데 초점을 맞췄습니다. 다만 이런 임플란트 비용 최소화 계획은 남은 치아 상태, 잇몸과 뼈 조건, 교합 등을 종합적으로 판단해 결정되는 부분이라, 개인마다 적용 범위가 다를 수 있다는 점은 참고해 주시면 좋겠습니다.
식립 과정 – 수면 하 발치·식립 동시 진행
치료 부담과 내원 횟수를 줄이기 위해, 이번 사례에서는 의식하진정법(수면 마취)을 이용해 발치와 임플란트 식립을 같은 세션에 함께 진행하기로 했습니다. 수면 임플란트 치료는 전신마취처럼 의식을 완전히 잃는 것이 아니라, 진정제를 이용해 가수면 상태를 유도하는 방식입니다. 환자분은 잠을 자는 듯한 편안한 느낌으로 치료를 받으시게 되고, 치료 중 겪을 수 있는 긴장감이나 구역반사가 크게 줄어듭니다. 다만 수면진정법은 전신 건강 상태에 따라 적용 가능 여부가 달라질 수 있어, 진료 전 문진과 상담을 통해 안전하게 적용할 수 있는지를 먼저 확인하게 됩니다.

계획했던 위치에 임플란트를 식립한 직후의 파노라마입니다. 식립 직후 엑스레이를 다시 촬영하여 픽스처가 계획된 위치와 각도로 잘 고정되었는지, 인접한 치아나 신경관과의 거리는 안전한지를 꼼꼼하게 점검합니다. 이번 사례에서는 특별한 염증 소견 없이 각 구역에 어금니 기능을 담당할 고정체가 안정적으로 자리 잡은 모습이 관찰되었습니다.
골융합 확인 후, 최종 보철 수복
픽스처가 뼈와 충분히 결합되어 고정력이 확보된 것을 확인한 뒤에 최종 보철물을 올리게 됩니다. 이 과정을 골융합(골유착)이라고 하며, 회복 기간은 골질과 식립 부위, 전신 상태에 따라 개인차가 있을 수 있습니다.
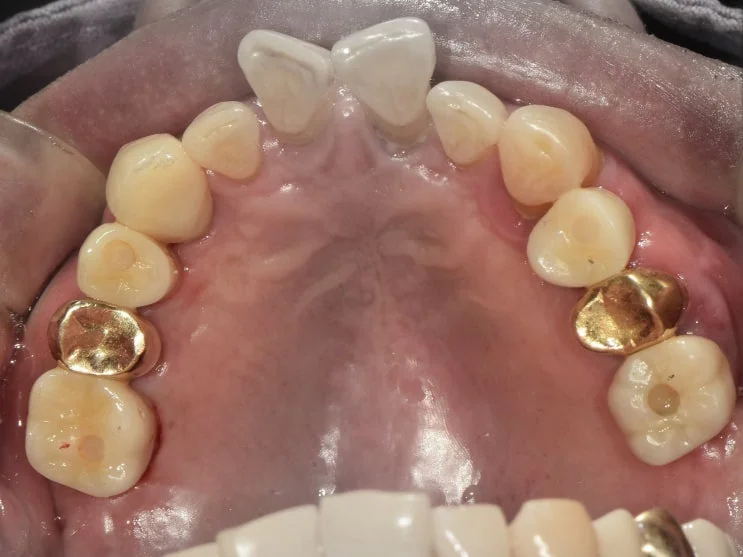
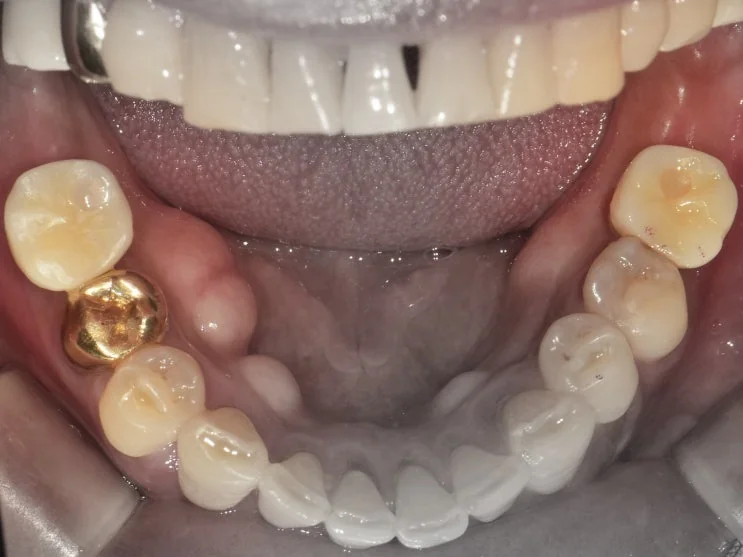
어금니 부위인 만큼 저작이 중요하기 때문에, 교합이 잘 이루어지도록 높이·폭경·풍융부 재현까지 세밀하게 살펴 보철물을 완성했습니다.
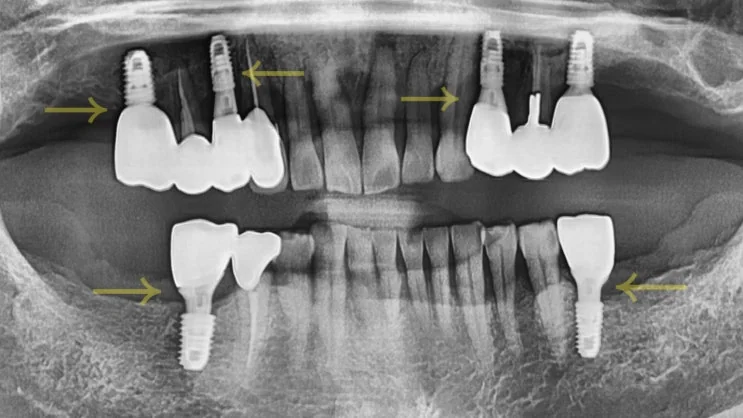
최종 파노라마에서 각 구역의 보철이 안정적으로 자리 잡은 모습을 확인할 수 있었습니다.
치료 후 결과 및 관리
구강 내에서 직접 확인한 최종 보철에서도 남아 있는 자연치아와 조화롭게 어우러진 모습을 보실 수 있었습니다. 씹는 면의 형태와 높이를 주변 치아와 맞춰 조정했기 때문에, 저작 기능 회복은 물론 교합의 안정성까지 함께 고려된 결과물입니다. 임플란트 비용 절감을 위해 어금니1개까지 수복을 시켰습니다.
임플란트 식립 후 초기에는 시술 부위에 약간의 붓기나 압통이 있을 수 있으며, 이는 대부분 며칠 내로 가라앉습니다. 식립 직후에는 너무 딱딱하거나 질긴 음식은 피하시고, 반대편이나 부드러운 음식 위주로 식사하시는 것이 좋습니다. 흡연과 음주는 골융합을 방해할 수 있어 치유 기간 동안에는 자제해 주셔야 하며, 최종 보철물을 장착하신 이후에도 정기적인 검진을 통해 임플란트 주변 잇몸 상태와 나사 고정 상태를 확인받으시는 것이 장기적인 사용 수명을 위해 중요합니다. 임플란트 비용은 최소화하면서 효율은 극대화 시킨 방법이라볼수 있습니다.
자주 묻는 질문
Q. 치아가 많이 빠졌는데 꼭 전부 임플란트를 심어야 하나요?
반드시 모든 자리를 채워야 하는 것은 아닙니다. 씹는 기능에서 핵심이 되는 어금니를 구역별로 우선 회복하는 방식으로도 저작 기능을 되살릴 수 있습니다. 다만 남은 치아와 잇몸·뼈 상태에 따라 필요한 개수는 달라질 수 있어, 검진 후 개별적인 판단이 필요합니다.
Q. 임플란트 비용 부담을 줄이면서 씹는 기능을 회복할 수 있나요?
상·하·좌·우 각 구역에 어금니를 1개 정도씩 회복시키는 전략적 식립으로, 식립 개수를 줄이면서 임플란트 비용을 절감시키고 저작 기능을 확보하는 방향을 고려해볼 수 있습니다. 적용 여부와 범위는 개인의 구강 조건에 따라 달라질 수 있습니다.
Q. 발치와 임플란트 식립을 같은 날 동시에 진행할 수 있나요?
조건이 맞는 경우 발치와 식립을 같은 세션에 함께 진행하기도 합니다. 내원 횟수와 부담을 줄일 수 있는 방법이지만, 뼈와 염증 상태 등에 따라 가능 여부가 달라질 수 있습니다.
Q. 수면(의식하진정) 마취는 안전한가요?
의식하진정법은 환자의 긴장을 줄여 편안하게 치료받도록 돕는 방법으로 활용됩니다. 다만 전신 상태와 복용 약물 등을 사전에 확인하고 모니터링하에 진행되어야 하므로, 진료 전 상담에서 개별적으로 평가하게 됩니다.
Q. 임플란트 식립 후 최종 보철물은 언제 완성되나요?
일반적으로 식립 후 골융합과 고정력을 확인하는 기간을 거친 뒤 최종 보철 제작에 들어갑니다. 소요 기간은 뼈 상태와 식립 부위에 따라 개인차가 있을 수 있습니다.
치료 결과와 회복 양상은 개인의 구강 상태, 골질, 전신 건강, 관리 습관 등에 따라 다르게 나타날 수 있습니다. 정확한 진단과 치료 계획은 반드시 내원 후 전문의와의 충분한 상담을 통해 결정하시기를 권해드립니다.
임플란트 비용에 대해 더 자세한 내용이 궁금하시다면, 아래 정리해 둔 가이드도 함께 참고해 보세요.
English Summary – Strategic, Cost-Conscious Implant Treatment for Multiple Missing Teeth
Hello, this is Dr. Kim Min-soo of Seoul The Nature Dental Clinic in Gangdong-gu, Seoul, near Myeongil Station. In this post I want to walk through a case that many patients relate to: extensive tooth loss combined with a real concern about the cost and duration of implant treatment. Implants are the right choice when they are genuinely needed, but as the number of implants grows, so does the financial and time burden. This case shows how a treatment plan can be designed to lower that burden while still restoring the function that matters most.
When the patient first visited, both the upper and lower arches had already lost several molars. Among the remaining teeth, secondary caries had developed beneath old restorations, and the front teeth showed cervical wear along with gingival recession. In the areas where teeth had been missing for a long time, the ridge width had narrowed. Taken together, the oral environment had reached a point where, without starting treatment soon, even the remaining teeth were at risk of deteriorating further.
Looking only at the clinical picture, a large number of implants appeared necessary. In practice, however, placing that many implants was not realistic once cost and treatment time were considered together. So instead of trying to fill every missing space, we set a clear priority: restore roughly one molar in each of the four quadrants so that chewing function could be recovered. The goal was to keep the number of implants to a minimum while still securing the function of mastication. Even when weighing efficiency, my responsibility as the clinician is to make sure the teeth can actually do their job, so the focus was on bringing back the lost ability to chew.
To reduce both the treatment burden and the number of visits, we used conscious sedation so that extractions and implant placement could be carried out within the same session. This approach can be more comfortable for patients who feel anxious or who have a strong gag reflex, though whether it is appropriate depends on each person’s general health, medications, and the condition of the bone and surrounding tissue. After placement, the panoramic image showed the fixtures seated in their planned positions, each set to take on the role of a functioning molar in its quadrant.
Following surgery, we waited several months to confirm osseointegration and stability before moving on to the final prosthesis. Because these were molar sites where chewing forces are significant, we paid close attention to occlusion, restoring the height, width, and contour so that the bite would come together properly. The final panoramic image confirmed that the restorations in each quadrant were stable and functioning as intended.
It is also worth understanding why extensive tooth loss tends to snowball if it is left alone. When molars are missing, the chewing load shifts onto the remaining teeth, which can accelerate wear, mobility, and secondary decay in those teeth. The bone that once supported the missing teeth gradually resorbs, and the ridge narrows over time, which is exactly what we observed in this patient. Neighboring and opposing teeth may also drift or over-erupt into the empty space, subtly changing the bite. Each of these changes makes later treatment more complex, which is one reason we felt it was important to intervene rather than continue to wait, even while keeping the overall plan conservative in scope.
After the restorations were delivered, the work does not simply end there. Implants do not develop decay in the way natural teeth do, but the surrounding gum and bone still require care, and inflammation around an implant can threaten its long-term stability if it is not managed. For that reason, consistent home care and regular check-ups are an important part of protecting the outcome. Occlusion can also change gradually over time, so periodic review of the bite helps ensure that the chewing forces stay well distributed across the restored quadrants.
The value of a plan like this is that, rather than filling every space with an implant, it prioritizes the molars that are functionally essential. This can lower the cost and the length of treatment while still achieving the core objective of restored chewing. It is important to note, however, that this kind of strategy is decided only after a comprehensive assessment of the remaining teeth, the gums and bone, and the overall bite. The range of application therefore differs from person to person, and the details described here reflect one specific case rather than a fixed rule that applies to everyone.
지금까지 서울더자연치과 치과의사 김민수였습니다.
본 포스팅은 의료법 제56조(의료광고의 금지 등)를 준수하여 작성되었으며, 실제 내원 환자분의 동의하에 공개된 사진입니다. 개인에 따라 진료 및 치료 방법이 다르게 적용될 수 있고, 효과와 부작용이 다르게 나타날 수 있습니다. 진료 전 전문 의료진과의 충분한 상담을 권해드립니다.